Thursday, 31 January 2013

Crackle Chairs (& Some Pretty Cool Industrial Lights)..

after

We've been busy painting the outside of the house, which has pretty much consumed all of my waking spare time.

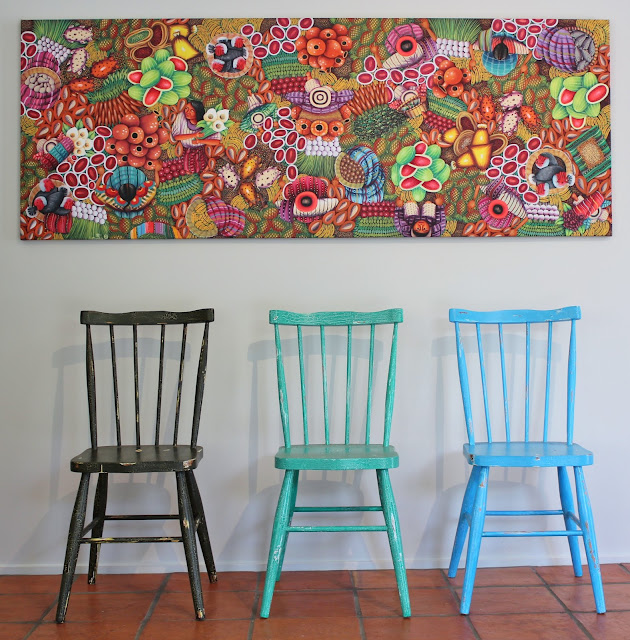
So I've put down the paintbrush and roller, and I'm pretty excited to be sharing with you my dining chairs which I re-purposed with some vibrant colours and Resene's crackle medium (see http://damzlindistress.blogspot.co.nz/2013/01/mirror-mirror-leaning-on-wall.html if you want to find out more)

The chairs were bought from the guy who owned the Love, Vintage, Retro store in Kingsland they were desperate for a bit of TLC with broken legs and an annoying case of the wobbles (a big thanks to those who helped me break them up and glue them back together).


After they were repaired, and sanded I used a white primer as the undercoat and thought that it would look good as the bottom crackle layer.

Resene crackle was applied and once dry I got to it with my bright colours! This was really one of the first times I had used this before and success - it worked brilliantly on my first chair.  As it turned out this happened to be a complete stroke of luck as the next two chairs took several attempts to get them right (stay tuned my crackle 101 tips coming real soon). Couldn't help myself, so I distressed the chairs too.  Just like all my other creations, I painted a couple of coats of water-based polyurethane over the top to protect them.

Final result.... one happy damzl in distress with a very funky dining table!


Our lights are old factory industrial lights which we gutted out and revived with a good clean and a lick of paint on the cool philips box above.  

Let me know if you are interested in the industrial lights - we have a few in storage and hoping to sell them.


Enjoy! :)

Thursday, 17 January 2013

Mirror Mirror leaning on the Wall..

I thought I'd share a mirror that I re-purposed with a crackle medium.


For those of you who have tried a crackle product before, you'll know that it takes a bit of playing around with to get it to crackle just right (ohhhh and I do get a wee bit excited when I see the cracks forming).  I'll put up my best tips for using crackle in a later post.

I was super stoked with my mirror purchase, which I got for $25 on trademe and is a biggin'. It already had a cute gold colour which I thought would look pretty as my crackle undercoat.  Basically crackle works - undercoat colour, crackle, topcoat colour.  So your top coat will 'crack' and underneath you will see your undercoat showing through. This could be wood or paint, or a combination depending on the end result you're looking for.


I taped my mirror off, then I gave the frame a good clean with meths. Next I applied my crackle (resene crackle which I highly recommend). I like to put on a thick coat of crackle, the thicker the bigger the cracks, but make sure you catch the drips!  The crackle needs to be completely dry before you paint over it, sometimes pays to just wait until the next day to be really sure.  After it was dry, I used black paint over the top in one thick swoop! A bit of distressing here and there, and some water based poly.


Unfortunately I've lost all my 'before' pics so you will just have to enjoy the aftermath..


Ciao!

Sunday, 13 January 2013

Cute Coffee Table


after

Another great trademe find.. this little treasure took a while for me to get started on.  When I first picked it up, the wood on top had split apart and separated requiring a builders touch (thanks Pa).

before

I really wanted to try giving it a dark stained top look with a white distressed base just like The Painted Hive's little beauty.  I gave it a good sanding, filled in the gaps with a mahogany coloured wood filler and used a dye stain in walnut.


After priming, the base and legs were painted in vivid white, distressed, and the whole piece got a couple of licks of water based polyurethane.


I love the look of the round coffee table in our very square lounge and the contrast of dark wood with the painted base.  Charlie (the dog) isn't so impressed now that the coffee table is out of bounds following a-tail-connects-with-beer episode. Ohhh and if you're wondering about the cute yellow candles in the tea glasses - they were homemade by a good friend of mine :) the old cinema lamp was one of my recent finds from Junk & Disorderly.


Until next time...............................................................................................

Saturday, 12 January 2013

Because it made sense to start where it all began....

So here it is, my first post.. it's been a long time coming, and as always I've procrastinated until I can't any longer.  So here it is, my beautiful hutch dresser.

after 


What better way to start than sharing my first juicy piece of restoration that proudly stands in our beautiful new kitchen. Inspired by Sweet Pickins Furniture (as has most of my work!) it is probably still one of my fav pieces to date. After I saw Sausha's stunning hutch, I knew I had to make my own, and for those of you who know me well, I rarely give up on anything once my mind is set.


First I needed to find a potential piece in need of some TLC (or what the other half would call clutter in the man cave).  I thought it was perfect.


before


I bought it off trademe and knew that with all the cute detail, once I had finished with my paint brush and distressing it would be adorable.


The glass was removed and replaced with black painted chicken wire, the handles had a makeover, and the paint scraper helped me create the distressed chippy look. Swoon.


I am totally in love with my hutch dresser.


Thanks for reading and stay tuned..........